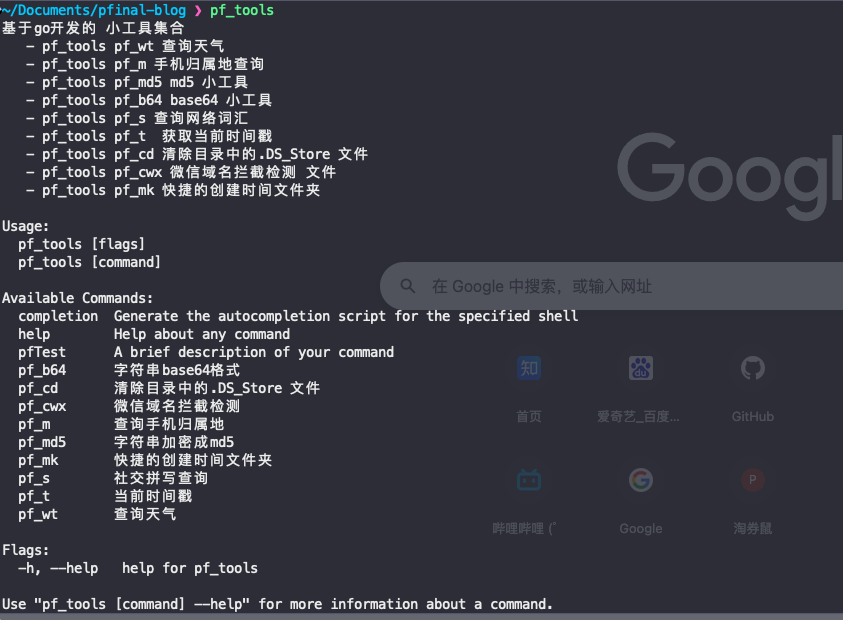
背景 前面使用 Go 的 cobra/cobra 库开发了一个命令行小工具,这个工具的使用体验还不错,帮助我简化了不少日常任务。当同事们看到这个工具后,表示也想试试。最初我打算直接基于 GitHub Actions 打包发布,然后让他们自己下载使用。然而,由于某些同事在国内访问 GitHub 不太方便,再加上他们大多是 MacOS 用户,我决定采用更加便捷的 Homebrew 来进行分发。Homebrew 是 MacOS 上非常流行的包管理工具,使用它能够方便地安装和管理各种软件包。
于是,我决定通过 GitHub Actions 和 GoReleaser 实现工具的自动化发布,并通过 Homebrew 分发,这样同事们只需运行 brew install 就可以轻松安装和使用这个工具了。
GitHub Actions 的打包 在开始使用 GitHub Actions 打包之前,我们首先需要为项目创建一个标签(Tag)。这个标签将用于标识版本并触发 GitHub Actions 工作流。
步骤1:为项目打标签 使用以下命令为项目创建一个标签并推送到远程仓库:
1
2
3
4
git tag v1.0.0 git push origin v1.0.1
这样,我们的第一个版本标签 v1.0.0 就创建好了,并且已经推送到 GitHub 仓库,准备进行后续的自动化发布。
步骤2:配置 GitHub Actions 工作流 接下来,我们需要在项目中创建一个 GitHub Actions 工作流配置文件 .yml,用于定义如何构建、测试和发布这个工具。以下是一个示例配置文件:
1 2 3 4 5 6 7 8 9 10 11 12 13 14 15 16 17 18 19 20 21 22 23 24 25 26 27 28 29 30 31 32 33 34 35 36 37 38 39 40 41 42 43 44 45 46 47 48 49 50 51 52 53 54 55 56 57 58 59 60 61 62 63 64 65 66 67 68 69 70 71 72 73 74 75 76 77 78 79 80 81 82 83 84 85 86 87 88 89 90 91 92 93 94 95 96 97 98 99 100 101 102 103 104 105 106 107 108 109 110 111 112 113 114 115 116 117 118 119 120 121 122 name: Go on: push: branches: [ "master" ] tags: - 'v*.*.*' pull_request: branches: [ "master" ] jobs: build: runs-on: ubuntu-latest strategy: matrix: goos: [linux , darwin , windows ] goarch: [amd64 , arm64 ] steps: - uses: actions/checkout@v4 - name: Set up Go uses: actions/setup-go@v4 with: go-version: "1.22" - name: Build run: | mkdir -p ./dist/${{ matrix.goos }}_${{ matrix.goarch }} GOOS=${{ matrix.goos }} GOARCH=${{ matrix.goarch }} go build -o ./dist/${{ matrix.goos }}_${{ matrix.goarch }}/pf_tools-${{ matrix.goos }}_${{ matrix.goarch }}${{ matrix.goos == 'windows' && '.exe' || '' }} -v ./main.go - name: Test run: go test -v ./... - name: Upload artifacts uses: actions/upload-artifact@v3 with: name: pf_tools-${{ matrix.goos }}_${{ matrix.goarch }} path: ./dist/${{ matrix.goos }}_${{ matrix.goarch }}/pf_tools* release: needs: [build ] runs-on: ubuntu-latest steps: - name: Download Linux artifacts uses: actions/download-artifact@v3 with: name: pf_tools-linux_amd64 path: ./dist/linux_amd64/ - name: Download artifacts uses: actions/download-artifact@v3 with: name: pf_tools-darwin_amd64 path: ./dist/darwin_amd64/ - name: Download artifacts uses: actions/download-artifact@v3 with: name: pf_tools-darwin_arm64 path: ./dist/darwin_arm64/ - name: Download artifacts uses: actions/download-artifact@v3 with: name: pf_tools-windows_amd64 path: ./dist/windows_amd64/ - name: Create Release id: create_release uses: actions/create-release@v1 env: GITHUB_TOKEN: ${{ secrets.GITHUB_TOKEN }} with: tag_name: ${{ github.ref }} release_name: Release ${{ github.ref }} draft: false prerelease: false - name: Upload Release Asset Linux uses: actions/upload-release-asset@v1 env: GITHUB_TOKEN: ${{ secrets.GITHUB_TOKEN }} with: upload_url: ${{ steps.create_release.outputs.upload_url }} asset_path: ./dist/linux_amd64/pf_tools-linux_amd64 asset_name: pf_tools-linux_amd64 asset_content_type: application/octet-stream - name: Upload Release Asset macOS amd uses: actions/upload-release-asset@v1 env: GITHUB_TOKEN: ${{ secrets.GITHUB_TOKEN }} with: upload_url: ${{ steps.create_release.outputs.upload_url }} asset_path: ./dist/darwin_amd64/pf_tools-darwin_amd64 asset_name: pf_tools-darwin_amd64 asset_content_type: application/octet-stream - name: Upload Release Asset macOS arm uses: actions/upload-release-asset@v1 env: GITHUB_TOKEN: ${{ secrets.GITHUB_TOKEN }} with: upload_url: ${{ steps.create_release.outputs.upload_url }} asset_path: ./dist/darwin_arm64/pf_tools-darwin_arm64 asset_name: pf_tools-darwin_arm64 asset_content_type: application/octet-stream - name: Upload Release Asset Windows uses: actions/upload-release-asset@v1 env: GITHUB_TOKEN: ${{ secrets.GITHUB_TOKEN }} with: upload_url: ${{ steps.create_release.outputs.upload_url }} asset_path: ./dist/windows_amd64/pf_tools-windows_amd64.exe asset_name: pf_tools-windows_amd64.exe asset_content_type: application/octet-stream
通过这个 GitHub Actions 配置,我们可以自动化地构建、测试和发布工具的各个平台版本(包括 Linux、macOS、Windows),并将这些构建好的二进制文件发布到对应的 Release 版本中。
最终生成的 Release 包含了以下文件:
1
2
3
4
5
6
pf_tools-linux_amd64 pf_tools-darwin_amd64 pf_tools-windows_amd64.exe
发布到Homebrew 为了让其他用户能够方便地通过 Homebrew 安装和使用我们的工具,我们需要将工具发布到 Homebrew 上。
准备工作 在前面的步骤中,我们已经生成了各个平台版本的工具二进制文件。接下来,我们需要复制这些文件的下载链接,并创建一个 Ruby 配方文件(.rb 文件),这个文件将用于在 Homebrew 中定义如何安装我们的工具。
创建 Homebrew 配方 运行以下命令来创建一个初始的 Homebrew 配方文件:
1
2
3
brew create https://github.com/PFinal-tool/pf_tools/releases/download/v1.0.0/pf_tools-darwin_amd64
PS: 这个命令运行会出现 Error: No available tap homebrew/core. 表示 homebrew/core. 这个没有安装,需要 执行一下 brew tap –force homebrew/core 安装一下
创建完配方后,会生成一个初始的 .rb 文件,内容如下:
1 2 3 4 5 6 7 8 9 10 11 12 13 14 15 16 17 18 19 20 21 22 23 24 25 26 27 28 29 30 31 32 33 class PfTools < Formula desc "基于go 开发的 命令行小工具" homepage "" url "https://github.com/PFinal-tool/pf_tools/releases/download/v1.0.0/pf_tools-darwin_amd64" sha256 "ea263aa15e0b5376d1238fbe3d9c394cda335679ab4a0f44467a5cd6eb03334b" license "NOASSERTION" def install system "./configure" , "--disable-silent-rules" , *std_configure_args end test do system "false" end end
这是一个针对单一平台的配置文件。为了支持多个平台,我们需要对其进行修改:
1
2
3
4
5
6
7
8
9
10
11
12
13
14
15
16
17
18
19
20
21
22
class PfTools < Formula desc "命令行小工具集合" homepage "https://github.com/PFinal-tool/pf_tools" version "1.0.1" if Hardware::CPU .intel? url "https://github.com/PFinal-tool/pf_tools/releases/download/v1.0.1/pf_tools-darwin_amd64" sha256 "d58b2b0b4d9efb6f7e86f6816d1b7d86a3b64db630012a3a1e5f6088ccd1dc7c" elsif Hardware::CPU .arm? url "https://github.com/PFinal-tool/pf_tools/releases/download/v1.0.1/pf_tools-darwin_arm64" sha256 "1fd49c1c3a518ecbb1ca4a2e48961461acc3b67958e188b76031523f437fbb58" else odie "Unsupported CPU architecture" end def install bin.install "pf_tools-darwin_amd64" => "pf_tools" if Hardware::CPU .intel? bin.install "pf_tools-darwin_arm64" => "pf_tools" if Hardware::CPU .arm? system "xattr" , "-c" , "#{bin} /pf_tools" end end
本地安装测试一下: 修改完后,我们可以使用以下命令在本地进行安装测试:
1
2
brew install --build-from-source ./pf_tools.rb
安装没有毛病,就可以发布到 线上了
发布线上
在本地测试成功之后,就可以把他发布了。这里需要在 GitHub 上创建一个名为 homebrew-tap 的 repo 注意该 repo 需要以 homebrew- 为前缀。
在上传之前,我们还需要在本地初始化 Homebrew Tap:
1
2
brew tap-new PFinal-tool/homebrew-pf_tools
然后将刚才的 pf_tools.rb 脚本上传到这个 repo ,然后就可以通过 brew 的方式安装了。
验证 Homebrew Tap 1 2 3 brew tap PFinal-tool/pf_tools && brew install pf_tools
如果安装过程顺利完成,并且可以正常运行 pf_tools 命令,那么说明我们成功地通过 Homebrew 发布了这个工具。