
Mac Desktop Application Development with Wails
In the Go language ecosystem, Wails is an excellent cross-platform desktop application development framework. This article will introduce in detail how to use Wails to develop Mac desktop applications, including project creation, architecture design, frontend-backend communication and other core content.
Recently, I've been learning Wails development and created a Mac desktop application based on Wails and Web technology stack. During this process, I gained a deep understanding of Wails' architectural design and development workflow. Now I'll record the entire development process, hoping to provide reference for other developers.
🎯 Wails Framework Introduction
What is Wails?
Wails is a project that allows you to write desktop applications using Go and Web technologies. Think of it as Go's fast and lightweight alternative to Electron. Wails comes with many pre-configured templates that let you quickly get up and running with applications. There are templates for the following frameworks: Svelte, React, Vue, Preact, Lit and Vanilla. Each template has JavaScript and TypeScript versions.
Wails' Core Advantages
- Lightweight: Compared to Electron, Wails is more lightweight and doesn't need to package the entire Chromium
- High Performance: Uses system-native WebView with excellent performance
- Cross-platform: Supports Windows, macOS, Linux three major platforms
- Development Efficiency: Supports hot reload with good development experience
- Flexible Technology Stack: Supports multiple frontend frameworks and languages
Technical Architecture
Wails adopts a frontend-backend separation architecture design:
- Backend: Go language provides business logic and system API access
- Frontend: Web technology stack (HTML/CSS/JavaScript) provides user interface
- Communication: Data interaction between frontend and backend through APIs provided by Wails
📱 Project Effect Showcase
Application Interface
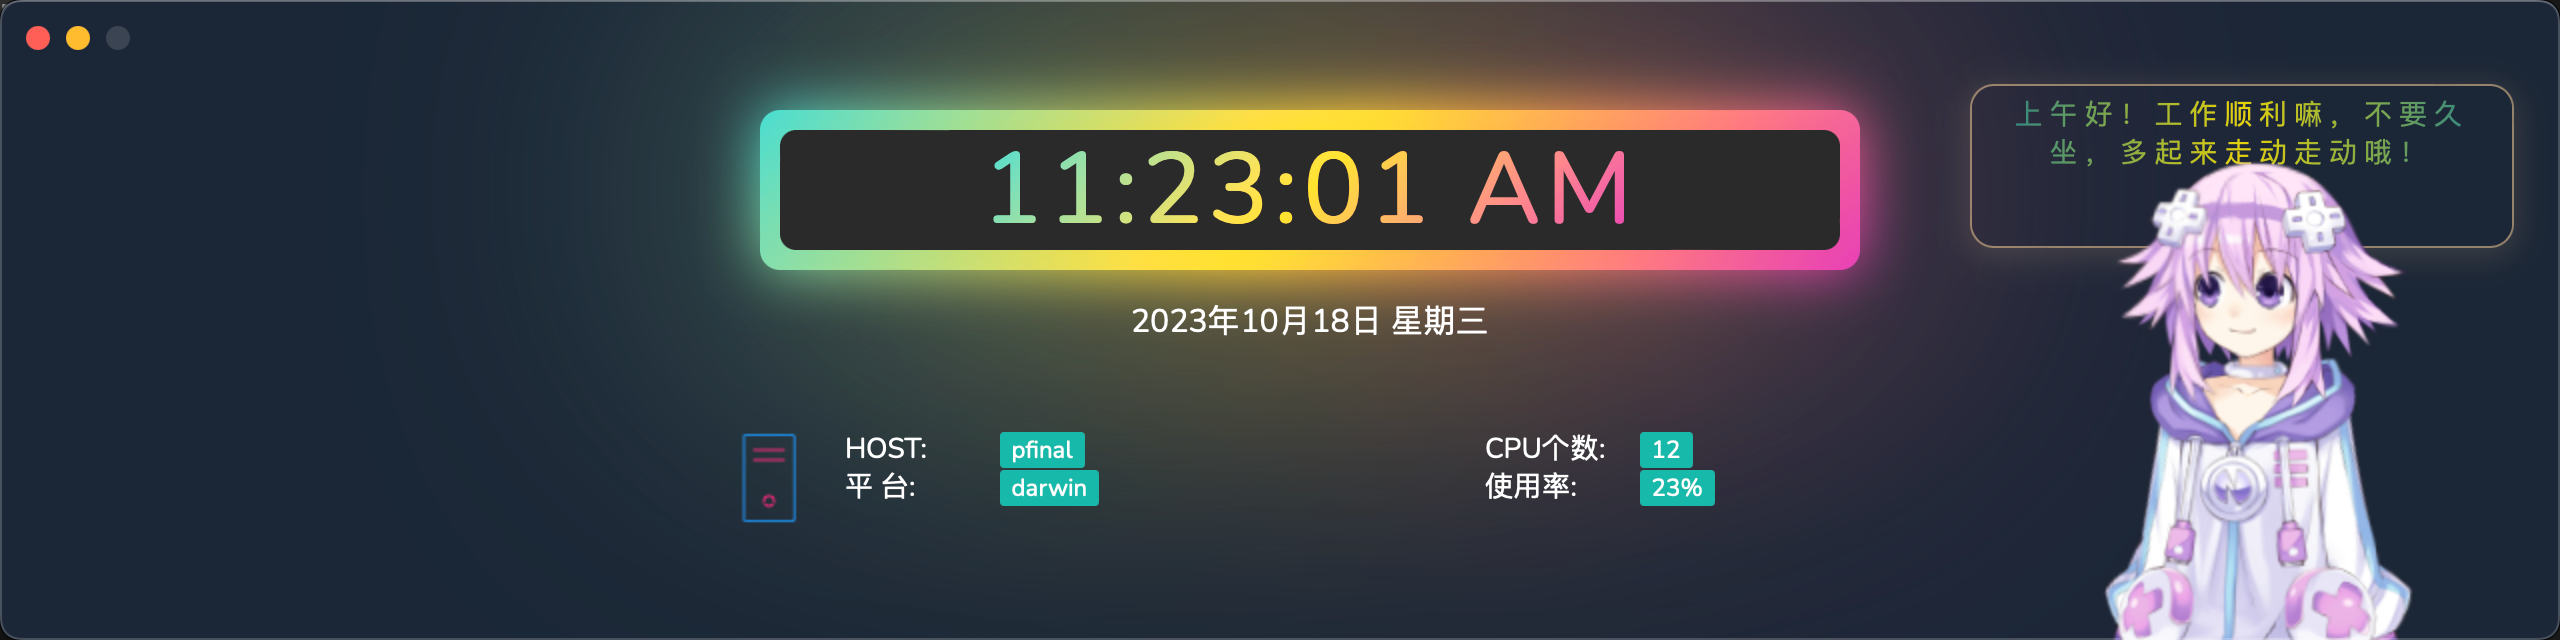
This is a system monitoring tool with main features including:
- CPU Usage Monitoring: Real-time display of CPU usage
- Memory Usage Monitoring: Display memory usage status
- System Information Display: Display CPU core count and other system information
- Real-time Data Updates: Real-time data refresh through WebSocket
Technical Features
- Lightweight Design: Small application size, fast startup
- Real-time Monitoring: Supports real-time monitoring of system resources
- Beautiful Interface: Adopts modern UI design
- Cross-platform Support: Cross-platform compatibility based on Wails
🚀 Project Creation and Initialization
Environment Preparation
Before starting development, ensure that the following prerequisites are met:
- Go: Wails requires Go version 1.18 or newer.
- NPM: For most templates, you will need NPM.
- Platform-Specific Dependencies:
- macOS: Xcode Command Line Tools. You can install them by running
xcode-select --install.
- macOS: Xcode Command Line Tools. You can install them by running
Once the prerequisites are installed, you can install the Wails CLI:
# Install Wails CLI
go install github.com/wailsapp/wails/v2/cmd/wails@latest
After installation, run wails doctor to check if your system is ready for Wails development. This command will check for all the required dependencies and provide instructions on how to install them if they are missing.
# Verify installation and check dependencies
wails doctor
Create Project
Use the wails init command to create a new project. You can specify a project name and a frontend template.
To create a project with a specific template, you can use the -t flag. Wails provides templates for popular frontend frameworks:
# Create a new project with the default Svelte template
wails init -n my-project

# Create a new project with a React template
wails init -n my-react-app -t react

# Create a new project with a Vue template
wails init -n my-vue-app -t vue

# Create a new project with a Vanilla JavaScript template
wails init -n my-vanilla-app -t vanilla
In this tutorial, we will use a pure HTML/JS template to keep things simple:
wails init -n wails_demo -t https://github.com/KiddoV/wails-pure-js-templateTemplate Selection
Wails provides multiple frontend template choices:
| Template Type | Use Cases | Complexity |
|---|---|---|
| Vue | Modern SPA applications | Medium |
| React | Complex interactive applications | Medium |
| Svelte | Lightweight applications | Simple |
| Vanilla JS | Simple applications | Simple |
| Lit | Web component applications | Medium |
This project chooses pure HTML/JS template, suitable for rapid prototyping and simple applications.
📁 Project Structure Analysis
Directory Structure
├── README.md                    # Project documentation
├── app.go                       # Application logic file
├── build/                       # Build output directory
│   ├── README.md
│   ├── appicon.png              # Application icon
│   ├── bin/                     # Executable files
│   │   └── pf_tools.app         # macOS application package
│   ├── darwin/                  # macOS build configuration
│   └── windows/                 # Windows build configuration
├── frontend/                    # Frontend code directory
│   ├── src/                     # Source code
│   │   ├── assets/              # Static resources
│   │   │   ├── fonts/           # Font files
│   │   │   └── images/          # Image resources
│   │   ├── libs/                # Third-party libraries
│   │   │   ├── echarts/         # Chart library
│   │   │   ├── jquery-3.4.1/    # jQuery library
│   │   │   ├── layui/           # UI framework
│   │   │   └── live2d/          # Live2D animation
│   │   ├── index.html           # Main page
│   │   ├── main.css             # Style file
│   │   └── main.js              # Main logic file
│   └── wailsjs/                 # Wails generated JS bindings
├── go.mod                       # Go module file
├── go.sum                       # Dependency verification file
├── main.go                      # Application entry file
├── pkg/                         # Package directory
│   └── sys/                     # System-related packages
│       └── sys.go               # System monitoring logic
├── test/                        # Test files
└── wails.json                   # Wails configuration file
Core File Description
| File | Purpose | Importance | Description |
|---|---|---|---|
| main.go | Application entry, window configuration | ⭐⭐⭐⭐⭐ | Application startup and window configuration |
| app.go | Application logic, frontend-backend communication | ⭐⭐⭐⭐⭐ | Business logic and API binding |
| pkg/sys/sys.go | System monitoring functionality implementation | ⭐⭐⭐⭐ | System resource monitoring core |
| frontend/src/index.html | Frontend main page | ⭐⭐⭐⭐ | User interface entry |
| frontend/src/main.js | Frontend logic processing | ⭐⭐⭐⭐ | Frontend interaction logic |
| wails.json | Wails project configuration | ⭐⭐⭐ | Project metadata configuration |
Architecture Design Philosophy
The project adopts a clear layered architecture design:
- Application Layer:
main.goresponsible for application startup and window configuration - Business Layer:
app.gohandles business logic and frontend-backend communication - Service Layer:
pkg/sys/sys.goprovides system monitoring services - Presentation Layer:
frontend/directory contains all frontend code
This layered design makes the code structure clear and easy to maintain and extend.
🎨 Frontend Layout and Configuration
Window Configuration Design
The initial design goal was to create a system monitoring tool suitable for 8.8-inch secondary screens, so the window configuration adopted a fixed-size design:
// main.go - Window configuration
err := wails.Run(&options.App{
    Title:             "PF_tools",           // Application title
    Width:             1280,                 // Window width (suitable for secondary screen)
    Height:            320,                  // Window height (compact design)
    MinWidth:          1280,                 // Minimum width (fixed size)
    MinHeight:         320,                  // Minimum height (fixed size)
    DisableResize:     true,                 // Disable window resizing
    Fullscreen:        false,                // Non-fullscreen mode
    Frameless:         false,                // Keep window borders
    StartHidden:       false,                // Show on startup
    HideWindowOnClose: true,                 // Hide instead of exit when closing
    BackgroundColour:  &options.RGBA{R: 16, G: 12, B: 42, A: 255}, // Dark background
    AlwaysOnTop:       true,                 // Window always on top
    Menu:              nil,                  // No menu bar
    Logger:            nil,                  // Default log configuration
    LogLevel:          logger.DEBUG,         // Debug log level
    OnStartup:         app.startup,          // Startup callback function
    OnDomReady:        app.domReady,         // DOM ready callback
    OnBeforeClose:     app.beforeClose,      // Before close callback
    OnShutdown:        app.shutdown,         // Shutdown callback
    WindowStartState:  options.Normal,       // Normal window state
    Bind: []interface{}{
        app,                                 // Bind application instance to frontend
    },
})
Design Considerations:
- Fixed Size: 1280x320 suitable for secondary screen display, avoiding user misoperation changing window size
- Window Always on Top: Ensure monitoring information is always visible
- Dark Theme: Reduce visual fatigue, suitable for long-term display
- Hide Instead of Exit: Keep application running in background for quick recovery
HTML Page Structure
<!DOCTYPE html>
<html>
<head>
    <meta http-equiv="Content-Type" content="text/html; charset=utf-8"/>
    <meta http-equiv="X-UA-Compatible" content="IE=Edge, Chrome=1">
    <meta name="viewport" content="width=device-width, initial-scale=1.0"/>
    <link rel="icon" type="image/png" href="data:image/png;base64,iVBORw0KGgo=">

    <!-- Style file imports -->
    <link rel="stylesheet" href="../libs/layui/css/layui.css"/>
    <link rel="stylesheet" href="../libs/live2d/assets/waifu.css"/>
    <link rel="stylesheet" href="main.css"/>

    <!-- JavaScript library imports -->
    <script src="../libs/jquery-3.4.1/jquery-3.4.1.min.js"></script>
    <script src="../libs/echarts/echarts.min.js"></script>
    <script src="../libs/layui/layui.js"></script>
    <script src="../libs/live2d/assets/waifu-tips.js"></script>
    <script src="../libs/live2d/assets/live2d.js"></script>
    <script src="main.js"></script>
</head>

<body id="app" class="app" style="--wails-draggable:drag">
Key Configuration Description:
- Resource Paths: Use relative paths
../libs/to reference third-party libraries, ensuring correct loading in Wails environment - Window Dragging:
style="--wails-draggable:drag"enables window dragging functionality, improving user experience - Compatibility: Set
X-UA-Compatibleto ensure consistent display across different browsers - Responsive:
viewportconfiguration supports responsive layout
JavaScript Interaction Logic
function event_cpu_on() {
    // Use Layui framework
    layui.use(function () {
        // Listen for CPU usage events
        runtime.EventsOn("cpu_usage", function (cpu_usage) {
            // Update CPU usage display
            document.getElementById("used").textContent = cpu_usage.avg + '% '
        })
    })

    // Call Go backend method to get CPU information
    window.go.main.App.CpuInfo().then(result => {
        // Parse returned JSON data
        res = JSON.parse(result)
        // Update CPU core count display
        document.getElementById("cpu_num").textContent = res.cpu_number
    }).catch(err => {
        console.log(err);
    }).finally(() => {
        console.log("finished!")
    });
}
Communication Mechanism Details:
Event Listening:
runtime.EventsOn("cpu_usage", callback)listens for CPU usage events sent by Go backend- Backend sends data through
runtime.EventsEmit(ctx, "cpu_usage", data) - Frontend receives in real-time and updates UI display
- Backend sends data through
Method Calls:
window.go.main.App.CpuInfo()directly calls Go backend methods- Handle asynchronous calls through Promise
- Return JSON format data, frontend parses and updates interface
Error Handling: Use
.catch()and.finally()to ensure program stability
🔧 Technical Implementation Details
Frontend-backend Communication Mechanism
Wails provides multiple frontend-backend communication methods. This project mainly uses the following two:
1. Event-driven Communication
// app.go - Backend event sending
func (a *App) startup(ctx context.Context) {
    // Start timer, send CPU usage every second
    go func() {
        ticker := time.NewTicker(time.Second)
        defer ticker.Stop()

        for {
            select {
            case <-ticker.C:
                cpuUsage := getCPUUsage()
                runtime.EventsEmit(ctx, "cpu_usage", cpuUsage)
            case <-ctx.Done():
                return
            }
        }
    }()
}// main.js - Frontend event listening
function event_cpu_on() {
layui.use(function () {
runtime.EventsOn("cpu_usage", function (cpu_usage) {
document.getElementById("used").textContent = cpu_usage.avg + '% '
})
})
}2. Method Call Communication
// app.go - Backend method definition
func (a *App) CpuInfo() string {
    info := getCPUInfo()
    jsonData, _ := json.Marshal(info)
    return string(jsonData)
}// main.js - Frontend method call
window.go.main.App.CpuInfo().then(result => {
res = JSON.parse(result)
document.getElementById("cpu_num").textContent = res.cpu_number
}).catch(err => {
console.log(err);
});System Monitoring Implementation
CPU Usage Monitoring
// pkg/sys/sys.go
func getCPUUsage() map[string]interface{} {
    var cpuUsage map[string]interface{}

    // Get CPU statistics
    cpuStats, err := cpu.Percent(time.Second, false)
    if err != nil {
        return map[string]interface{}{"avg": 0}
    }

    if len(cpuStats) > 0 {
        cpuUsage = map[string]interface{}{
            "avg": cpuStats[0],
            "timestamp": time.Now().Unix(),
        }
    }

    return cpuUsage
}
Memory Usage Monitoring
// pkg/sys/sys.go
func getMemoryInfo() map[string]interface{} {
    vmstat, err := mem.VirtualMemory()
    if err != nil {
        return map[string]interface{}{}
    }

    return map[string]interface{}{
        "total": vmstat.Total,
        "used": vmstat.Used,
        "free": vmstat.Free,
        "percent": vmstat.UsedPercent,
    }
}
🚀 Development and Building
Development Mode
# Start development mode (supports hot reload)
wails dev

# Start with specified port
wails dev -port 8080

# Start in debug mode
wails dev -debug
Building Applications
# Build for all platforms
wails build

# Build for specific platforms
wails build -platform darwin/amd64
wails build -platform darwin/arm64
wails build -platform windows/amd64
wails build -platform linux/amd64

# Build and package
wails build -package
Performance Optimization
- Resource Optimization: Use CDN or local caching for third-party libraries
- Code Splitting: Load JavaScript modules on demand
- Image Optimization: Use WebP format and appropriate compression
- Memory Management: Clean up event listeners and timers in time
📊 Project Summary
Technical Highlights
- Real-time Monitoring: Real-time system resource monitoring through WebSocket
- Cross-platform Compatibility: Windows/macOS/Linux support based on Wails
- Lightweight Design: Smaller application size and faster startup compared to Electron
- Modern UI: Adopts responsive design, supports multiple screen sizes
Development Experience
- Frontend-backend Separation: Clear architecture design facilitates maintenance and extension
- Event-driven: Reasonable use of event mechanisms for real-time data updates
- Error Handling: Complete error handling mechanisms improve application stability
- Performance Monitoring: Continuous monitoring of application performance, timely optimization
Extension Suggestions
- Add More Monitoring Indicators: Disk usage, network status, etc.
- Implement Data Persistence: Save historical monitoring data
- Add Alert Functions: Send alerts when resource usage exceeds thresholds
- Optimize UI Interactions: Add more interactive features and animation effects
📚 Project Resources
Complete Code
Project complete code hosted on GitHub: https://github.com/pfinal-nc/wails_pf
Quick Start
# Clone project
git clone git@github.com:pfinal-nc/wails_pf.git

# Enter project directory
cd wails_pf

# Build application
wails build
Build Output
After building, you can find the packaged application files in the build/bin/ directory:
- macOS:
pf_tools.app(macOS application package) - Windows:
wails_tools.exe(Windows executable file) - Linux:
wails_tools(Linux executable file)
Running Applications
# macOS
open build/bin/pf_tools.app

# Windows
./build/bin/wails_tools.exe

# Linux
./build/bin/wails_tools
Tags: #Go #Wails #Desktop Applications #System Monitoring #Cross-platform Development #macOS