
10个提升Golang开发效率的实用工具:从代码管理到性能优化
作为一个有多年 Go 开发经验的程序员,我深刻体会到工具对开发效率的影响。一套好的工具链不仅能提升代码质量,还能让开发过程更加愉悦。本文将分享我日常开发中必备的 10 个 Go 工具,从代码格式化到性能分析,全方位提升你的开发效率。
一、代码质量工具
1. gofumpt - 更严格的代码格式化
虽然 gofmt 是 Go 标准工具,但 gofumpt 提供了更严格的格式化规则,能让代码风格更加统一。
安装:
go install mvdan.cc/gofumpt@latest基本使用:
# 格式化单个文件
gofumpt -w main.go

# 格式化整个项目
gofumpt -l -w .

# 查看会被修改的内容(不实际修改)
gofumpt -d .
与 gofmt 的区别:
// gofmt 允许
var x = map[string]int{
	"a": 1, "b": 2,
}

// gofumpt 要求
var x = map[string]int{
	"a": 1,
	"b": 2,
}
在 VS Code 中集成:
{
  "go.formatTool": "gofumpt",
  "[go]": {
    "editor.formatOnSave": true
  }
}
2. golangci-lint - 代码静态分析利器
golangci-lint 集成了 50+ 种 linter,能够发现代码中的潜在问题。
安装:
# macOS/Linux
curl -sSfL https://raw.githubusercontent.com/golangci/golangci-lint/master/install.sh | sh -s -- -b $(go env GOPATH)/bin

# 或使用 go install
go install github.com/golangci/golangci-lint/cmd/golangci-lint@latest
配置文件 .golangci.yml:
linters:
  enable:
    - gofmt
    - govet
    - errcheck
    - staticcheck
    - unused
    - gosimple
    - structcheck
    - varcheck
    - ineffassign
    - deadcode
    - typecheck
    - gosec
    - gocyclo

linters-settings:
  gocyclo:
    min-complexity: 15
  govet:
    check-shadowing: true

run:
  timeout: 5m
  skip-dirs:
    - vendor
- testdata运行检查:
# 检查整个项目
golangci-lint run

# 只检查修改的文件
golangci-lint run --new-from-rev=HEAD~1

# 自动修复可修复的问题
golangci-lint run --fix
CI/CD 集成示例(GitHub Actions):
name: Go Lint
on: [push, pull_request]
jobs:
  golangci:
    runs-on: ubuntu-latest
    steps:
      - uses: actions/checkout@v3
      - uses: actions/setup-go@v4
        with:
          go-version: '1.21'
      - name: golangci-lint
        uses: golangci/golangci-lint-action@v3
        with:
          version: latest
3. go mod - 依赖管理
Go Modules 是官方的依赖管理工具,掌握它能大幅提升项目管理效率。
常用命令:
# 初始化模块
go mod init github.com/username/project

# 添加依赖
go get github.com/gin-gonic/gin@latest

# 更新依赖
go get -u ./...

# 清理未使用的依赖
go mod tidy

# 下载依赖到本地缓存
go mod download

# 将依赖拷贝到 vendor 目录
go mod vendor

# 查看依赖树
go mod graph

# 查看为什么需要某个依赖
go mod why github.com/pkg/errors
使用 replace 解决依赖问题:
// go.mod
module github.com/myproject

go 1.21

require (
    github.com/example/lib v1.0.0
)

// 使用本地版本
replace github.com/example/lib => ../lib

// 使用 fork 版本
replace github.com/example/lib => github.com/myfork/lib v1.1.0
二、开发效率工具
4. air - 热重载工具
air 是一个热重载工具,修改代码后自动重新编译和运行,极大提升开发体验。
安装:
go install github.com/cosmtrek/air@latest配置文件 .air.toml:
root = "."
testdata_dir = "testdata"
tmp_dir = "tmp"

[build]
  args_bin = []
  bin = "./tmp/main"
  cmd = "go build -o ./tmp/main ."
  delay = 1000
  exclude_dir = ["assets", "tmp", "vendor", "testdata"]
  exclude_file = []
  exclude_regex = ["_test.go"]
  exclude_unchanged = false
  follow_symlink = false
  full_bin = ""
  include_dir = []
  include_ext = ["go", "tpl", "tmpl", "html"]
  include_file = []
  kill_delay = "0s"
  log = "build-errors.log"
  poll = false
  poll_interval = 0
  rerun = false
  rerun_delay = 500
  send_interrupt = false
  stop_on_error = false

[color]
  app = ""
  build = "yellow"
  main = "magenta"
  runner = "green"
  watcher = "cyan"

[log]
  main_only = false
  time = false

[misc]
  clean_on_exit = false

[screen]
  clear_on_rebuild = false
keep_scroll = true使用:
# 使用默认配置
air

# 使用自定义配置
air -c .air.toml

# 指定构建命令
air -build.cmd "go build -tags dev -o ./tmp/main ."
5. cobra - 命令行工具开发框架
年底维护老项目时遇到一个实际问题:Mac 开发时会产生 .DS_Store 文件,每次打包都要手动删除,很麻烦。用 cobra 开发了一个小工具来解决这个问题。
安装 cobra-cli:
go install github.com/spf13/cobra-cli@latest创建项目:
# 初始化项目
mkdir pf_tools && cd pf_tools
go mod init github.com/pfinal/pf_tools
cobra-cli init

# 添加命令
cobra-cli add clean项目结构:
pf_tools/
├── cmd/
│   ├── root.go
│   └── clean.go
├── pkg/
│   └── cleaner/
│       └── cleaner.go
├── main.go
└── go.mod
实现清理功能 pkg/cleaner/cleaner.go:
package cleaner

import (
	"fmt"
	"os"
	"path/filepath"
)

type Cleaner struct {
	Path    string
	Removed int
	Errors  []error
}

func New(path string) *Cleaner {
	return &Cleaner{
		Path:    path,
		Removed: 0,
		Errors:  make([]error, 0),
	}
}

// RemoveFiles 删除指定文件名的所有文件
func (c *Cleaner) RemoveFiles(filename string) error {
	err := filepath.Walk(c.Path, func(path string, info os.FileInfo, err error) error {
		if err != nil {
			c.Errors = append(c.Errors, err)
			return nil // 继续遍历
		}

		// 跳过目录
		if info.IsDir() {
			return nil
		}

		// 匹配文件名
		if info.Name() == filename {
			if err := os.Remove(path); err != nil {
				c.Errors = append(c.Errors, fmt.Errorf("failed to remove %s: %w", path, err))
				return nil
			}
			fmt.Printf("✓ Removed: %s\n", path)
			c.Removed++
		}

		return nil
	})

	return err
}

// RemoveDSStore 删除 .DS_Store 文件
func (c *Cleaner) RemoveDSStore() error {
	return c.RemoveFiles(".DS_Store")
}

// Summary 打印清理摘要
func (c *Cleaner) Summary() {
	fmt.Printf("\n========== Summary ==========\n")
	fmt.Printf("Path:    %s\n", c.Path)
	fmt.Printf("Removed: %d files\n", c.Removed)

	if len(c.Errors) > 0 {
		fmt.Printf("Errors:  %d\n", len(c.Errors))
		for i, err := range c.Errors {
			fmt.Printf("  %d. %v\n", i+1, err)
		}
	}
	fmt.Printf("============================\n")
}
命令实现 cmd/clean.go:
package cmd

import (
	"fmt"
	"os"

	"github.com/pfinal/pf_tools/pkg/cleaner"
	"github.com/spf13/cobra"
)

var (
	targetPath string
	recursive  bool
	verbose    bool
)

var cleanCmd = &cobra.Command{
	Use:   "clean [path]",
	Short: "清除指定目录中的 .DS_Store 文件",
	Long: `清除 Mac 系统在目录中自动生成的 .DS_Store 文件。

Examples:
  # 清理当前目录
  pf_tools clean

  # 清理指定目录
  pf_tools clean /path/to/dir

  # 递归清理(默认)
  pf_tools clean -r /path/to/dir`,
	Run: runClean,
}

func init() {
	rootCmd.AddCommand(cleanCmd)

	cleanCmd.Flags().StringVarP(&targetPath, "path", "p", "", "目标路径")
	cleanCmd.Flags().BoolVarP(&recursive, "recursive", "r", true, "递归清理子目录")
	cleanCmd.Flags().BoolVarP(&verbose, "verbose", "v", false, "显示详细信息")
}

func runClean(cmd *cobra.Command, args []string) {
	// 确定目标路径
	path := targetPath
	if len(args) > 0 {
		path = args[0]
	}
	if path == "" {
		var err error
		path, err = os.Getwd()
		if err != nil {
			fmt.Printf("Error: %v\n", err)
			os.Exit(1)
		}
	}

	// 验证路径
	if _, err := os.Stat(path); os.IsNotExist(err) {
		fmt.Printf("Error: 路径不存在: %s\n", path)
		os.Exit(1)
	}

	// 执行清理
	fmt.Printf("开始清理 .DS_Store 文件: %s\n\n", path)

	c := cleaner.New(path)
	if err := c.RemoveDSStore(); err != nil {
		fmt.Printf("Error: %v\n", err)
		os.Exit(1)
	}

	// 显示摘要
	c.Summary()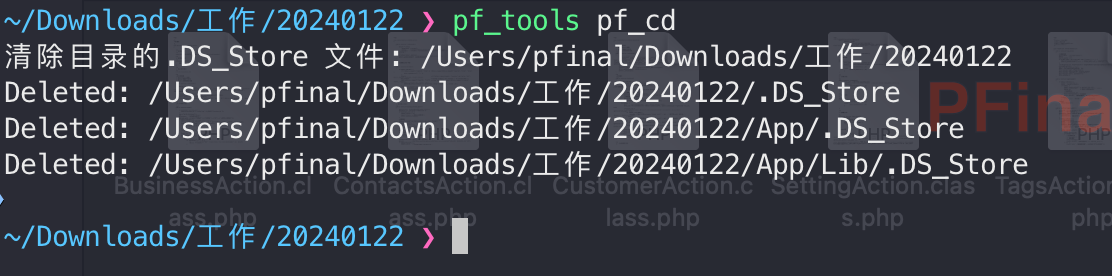
}效果图:
安装和使用:
# 构建
go build -o pf_tools .
# 安装到 $GOPATH/bin
go install
# 使用
pf_tools clean
pf_tools clean /path/to/project
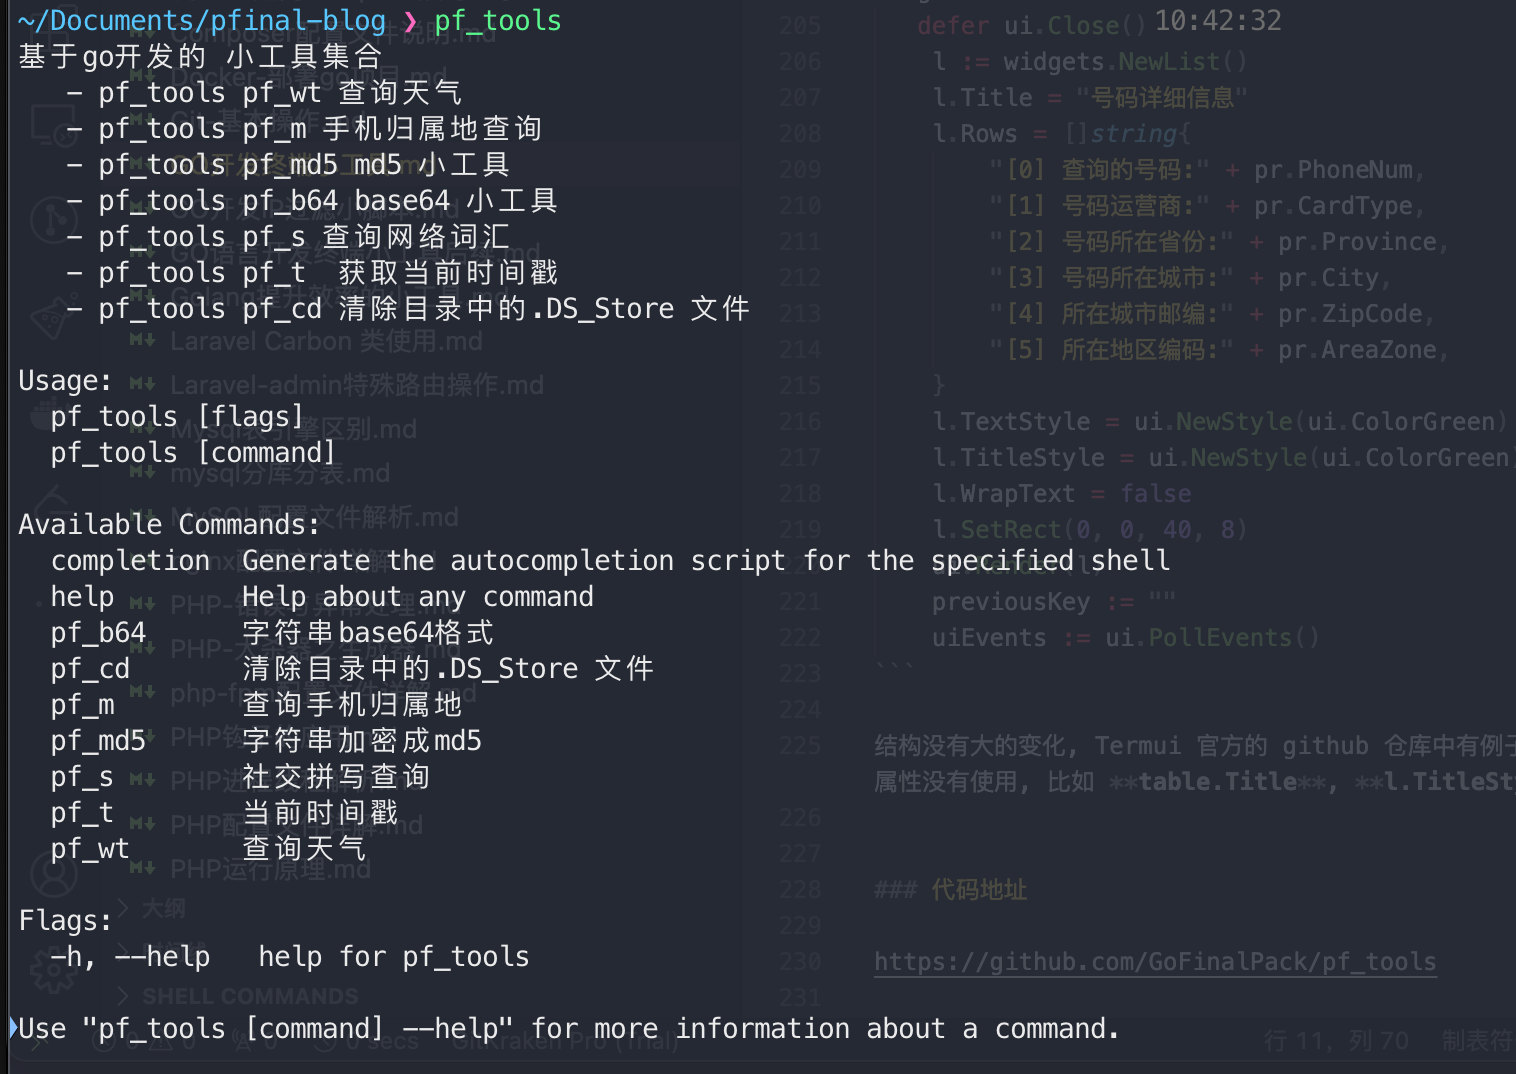
pf_tools clean -p /path/to/project -vHelp 信息:
三、性能分析工具
6. pprof - 性能分析神器
pprof 是 Go 内置的性能分析工具,能够分析 CPU、内存、协程等性能指标。
在程序中集成:
package main

import (
	"net/http"
	_ "net/http/pprof"  // 导入 pprof
	"runtime"
)

func main() {
	// 启用更详细的内存统计
	runtime.SetBlockProfileRate(1)
	runtime.SetMutexProfileFraction(1)

	// 启动 pprof 服务器
	go func() {
		http.ListenAndServe("localhost:6060", nil)
	}()

	// 你的业务代码
	startYourApp()
}采集性能数据:
# CPU 分析
go tool pprof http://localhost:6060/debug/pprof/profile?seconds=30

# 内存分析
go tool pprof http://localhost:6060/debug/pprof/heap

# 协程分析
go tool pprof http://localhost:6060/debug/pprof/goroutine

# 阻塞分析
go tool pprof http://localhost:6060/debug/pprof/block

# 互斥锁分析
go tool pprof http://localhost:6060/debug/pprof/mutex分析示例:
# 进入交互模式
$ go tool pprof http://localhost:6060/debug/pprof/heap
(pprof) top10  # 查看占用内存最多的 10 个函数
(pprof) list funcName  # 查看具体函数的内存分配
(pprof) web  # 在浏览器中查看调用图(需要 graphviz)
(pprof) pdf > profile.pdf  # 导出为 PDF
实战案例:优化内存占用
// 优化前:频繁分配小对象
func processData(data []string) []string {
	result := []string{}
	for _, item := range data {
		result = append(result, strings.ToUpper(item))
	}
	return result
}

// 优化后:预分配容量
func processDataOptimized(data []string) []string {
	result := make([]string, 0, len(data))  // 预分配
	for _, item := range data {
		result = append(result, strings.ToUpper(item))
	}
	return result
}性能对比:
# 压测
$ go test -bench=. -benchmem -cpuprofile=cpu.prof -memprofile=mem.prof

BenchmarkProcessData-8           100000    12345 ns/op    8192 B/op    10 allocs/op
BenchmarkProcessDataOptimized-8  200000     6789 ns/op    4096 B/op     1 allocs/op
7. dlv (Delve) - 强大的调试器
Delve 是专为 Go 设计的调试器,比 GDB 更好用。
安装:
go install github.com/go-delve/delve/cmd/dlv@latest基本使用:
# 调试程序
dlv debug main.go

# 调试测试
dlv test

# 附加到运行中的进程
dlv attach <pid>

# 远程调试
dlv --listen=:2345 --headless=true --api-version=2 debug main.go常用命令:
(dlv) break main.main  # 在 main 函数设置断点
(dlv) break main.go:10  # 在指定行设置断点
(dlv) continue  # 继续执行
(dlv) next  # 单步执行(不进入函数)
(dlv) step  # 单步执行(进入函数)
(dlv) print var  # 打印变量
(dlv) locals  # 查看局部变量
(dlv) goroutines  # 查看所有协程
(dlv) goroutine 1  # 切换到指定协程
(dlv) stack  # 查看调用栈
VS Code 集成 .vscode/launch.json:
{
  "version": "0.2.0",
  "configurations": [
    {
      "name": "Launch Package",
      "type": "go",
      "request": "launch",
      "mode": "debug",
      "program": "${workspaceFolder}",
      "args": []
    }
  ]
}
四、依赖注入工具
8. wire - Google 的依赖注入工具
Wire 是 Google 开发的编译时依赖注入工具,相比运行时反射,性能更好。
安装:
go install github.com/google/wire/cmd/wire@latest定义依赖 wire.go:
//go:build wireinject
// +build wireinject

package main

import (
	"github.com/google/wire"
)

// 数据库
type Database struct {
	DSN string
}

func NewDatabase() *Database {
	return &Database{DSN: "localhost:3306"}
}

// Repository
type UserRepository struct {
	DB *Database
}

func NewUserRepository(db *Database) *UserRepository {
	return &UserRepository{DB: db}
}

// Service
type UserService struct {
	Repo *UserRepository
}

func NewUserService(repo *UserRepository) *UserService {
	return &UserService{Repo: repo}
}

// Wire 注入
func InitializeUserService() *UserService {
	wire.Build(
		NewDatabase,
		NewUserRepository,
		NewUserService,
	)
	return nil  // wire 会生成实际代码
}生成代码:
# 在项目根目录执行
wire

# 会生成 wire_gen.go 文件
生成的代码 wire_gen.go:
// Code generated by Wire. DO NOT EDIT.

package main

func InitializeUserService() *UserService {
	database := NewDatabase()
	userRepository := NewUserRepository(database)
	userService := NewUserService(userRepository)
	return userService
}使用:
func main() {
	service := InitializeUserService()
	// 使用 service...
}
9. mockgen - 自动生成 Mock 代码
在单元测试中,经常需要 Mock 依赖。mockgen 可以自动生成 Mock 代码。
安装:
go install github.com/golang/mock/mockgen@latest定义接口:
package user

type UserRepository interface {
	GetUser(id int) (*User, error)
	SaveUser(user *User) error
	DeleteUser(id int) error
}
生成 Mock:
# 从源文件生成
mockgen -source=user.go -destination=mock/user_mock.go -package=mock

# 从包生成
mockgen -destination=mock/user_mock.go -package=mock github.com/myapp/user UserRepository在测试中使用:
package user_test

import (
	"testing"

	"github.com/golang/mock/gomock"
	"github.com/myapp/mock"
	"github.com/myapp/user"
)

func TestUserService(t *testing.T) {
	ctrl := gomock.NewController(t)
	defer ctrl.Finish()

	// 创建 Mock
	mockRepo := mock.NewMockUserRepository(ctrl)

	// 设置期望
	mockRepo.EXPECT().
		GetUser(1).
		Return(&user.User{ID: 1, Name: "Alice"}, nil)

	// 测试
	service := user.NewUserService(mockRepo)
	u, err := service.GetUserByID(1)

	if err != nil {
		t.Fatalf("expected no error, got %v", err)
	}
	if u.Name != "Alice" {
		t.Errorf("expected Alice, got %s", u.Name)
	}
}
五、项目管理工具
10. task - 现代化的构建工具
Task 是一个用 Go 编写的任务运行器,比 Make 更简单易用。
安装:
# macOS
brew install go-task/tap/go-task

# 或使用 go install
go install github.com/go-task/task/v3/cmd/task@latest
创建配置文件 Taskfile.yml:
version: '3'

vars:
  BINARY_NAME: myapp
  BUILD_DIR: ./build

tasks:
  default:
    desc: 显示所有可用任务
    cmds:
      - task --list

  build:
    desc: 构建应用
    cmds:
      - go build -o {{.BUILD_DIR}}/{{.BINARY_NAME}} ./cmd/main.go
    sources:
      - ./**/*.go
    generates:
      - "{{.BUILD_DIR}}/{{.BINARY_NAME}}"

  run:
    desc: 运行应用
    deps: [build]
    cmds:
      - "{{.BUILD_DIR}}/{{.BINARY_NAME}}"

  test:
    desc: 运行测试
    cmds:
      - go test -v -race -coverprofile=coverage.out ./...

  coverage:
    desc: 查看测试覆盖率
    deps: [test]
    cmds:
      - go tool cover -html=coverage.out

  lint:
    desc: 代码检查
    cmds:
      - golangci-lint run ./...

  fmt:
    desc: 格式化代码
    cmds:
      - gofumpt -l -w .
      - goimports -l -w .

  clean:
    desc: 清理构建文件
    cmds:
      - rm -rf {{.BUILD_DIR}}
      - rm -f coverage.out

  install:
    desc: 安装依赖
    cmds:
      - go mod download
      - go mod tidy

  docker:build:
    desc: 构建 Docker 镜像
    cmds:
      - docker build -t {{.BINARY_NAME}}:latest .

  docker:run:
    desc: 运行 Docker 容器
    deps: [docker:build]
    cmds:
      - docker run -p 8080:8080 {{.BINARY_NAME}}:latest

  dev:
    desc: 开发模式(热重载)
    cmds:
- air使用:
# 查看所有任务
task --list

# 运行任务
task build
task test
task run

# 运行多个任务
task fmt lint test

# 并行运行任务
task --parallel fmt lint
六、工具对比表格
| 工具 | 类别 | 主要功能 | 学习曲线 | 推荐度 |
|---|---|---|---|---|
| gofumpt | 代码格式化 | 更严格的代码格式化 | ⭐ | ⭐⭐⭐⭐⭐ |
| golangci-lint | 代码分析 | 集成多种 linter | ⭐⭐ | ⭐⭐⭐⭐⭐ |
| go mod | 依赖管理 | 官方依赖管理 | ⭐⭐ | ⭐⭐⭐⭐⭐ |
| air | 热重载 | 自动重新编译运行 | ⭐ | ⭐⭐⭐⭐ |
| cobra | CLI 开发 | 命令行工具开发 | ⭐⭐ | ⭐⭐⭐⭐⭐ |
| pprof | 性能分析 | CPU/内存性能分析 | ⭐⭐⭐ | ⭐⭐⭐⭐⭐ |
| dlv | 调试 | 专业 Go 调试器 | ⭐⭐⭐ | ⭐⭐⭐⭐ |
| wire | 依赖注入 | 编译时依赖注入 | ⭐⭐⭐ | ⭐⭐⭐⭐ |
| mockgen | 测试 | 自动生成 Mock | ⭐⭐ | ⭐⭐⭐⭐⭐ |
| task | 构建工具 | 任务运行器 | ⭐⭐ | ⭐⭐⭐⭐ |
七、完整开发工作流
1. 项目初始化
# 创建项目
mkdir myproject && cd myproject
go mod init github.com/username/myproject

# 初始化 git
git init

# 创建配置文件
touch .golangci.yml .air.toml Taskfile.yml

# 安装依赖
go mod tidy
2. 日常开发
# 启动热重载开发
task dev

# 或使用 air
air

# 格式化代码(保存时自动)
task fmt

# 运行测试
task test

# 查看覆盖率
task coverage
3. 提交前检查
# 格式化
task fmt

# 代码检查
task lint

# 运行测试
task test

# 提交代码
git add .
git commit -m "feature: add xxx"
4. 性能优化
# 启动 pprof 服务
# 在代码中添加 _ "net/http/pprof"

# 运行程序
go run main.go

# 分析性能
go tool pprof http://localhost:6060/debug/pprof/profile
5. 生产部署
# 构建
task build

# 或构建 Docker 镜像
task docker:build

# 运行
task docker:run
八、最佳实践建议
1. IDE 配置优化
VS Code settings.json:
{
  "go.useLanguageServer": true,
  "go.formatTool": "gofumpt",
  "go.lintTool": "golangci-lint",
  "go.lintOnSave": "workspace",
  "[go]": {
    "editor.formatOnSave": true,
    "editor.codeActionsOnSave": {
      "source.organizeImports": true
    }
  },
  "go.testFlags": ["-v", "-race"],
  "go.coverOnSave": true
}
2. 团队协作规范
在项目 README 中说明:
## 开发环境设置

### 必装工具
- Go 1.21+
- golangci-lint
- air(可选,用于热重载)
- task(可选,用于任务管理)

### 安装依赖
```bash
task install
# 或
go mod download
运行项目
task dev提交前检查
task fmt lint test3. CI/CD 集成
.github/workflows/ci.yml:
name: CI
on: [push, pull_request]

jobs:
  test:
    runs-on: ubuntu-latest
    steps:
      - uses: actions/checkout@v3
      - uses: actions/setup-go@v4
        with:
          go-version: '1.21'

      - name: Install dependencies
        run: go mod download

      - name: Run golangci-lint
        uses: golangci/golangci-lint-action@v3

      - name: Run tests
        run: go test -v -race -coverprofile=coverage.out ./...

      - name: Upload coverage
        uses: codecov/codecov-action@v3
        with:
          file: ./coverage.out
九、总结
这 10 个工具涵盖了 Go 开发的各个方面:
- 代码质量:gofumpt、golangci-lint 保证代码质量
- 开发效率:air、cobra、task 提升开发体验
- 性能优化:pprof、dlv 帮助定位和解决性能问题
- 架构设计:wire 简化依赖管理
- 测试保障:mockgen 简化单元测试
工欲善其事,必先利其器。掌握这些工具,你的 Go 开发效率至少能提升 50%!
参考资源
- gofumpt GitHub
- golangci-lint 文档
- Go Modules 官方文档
- air GitHub
- cobra 官方文档
- pprof 官方文档
- Delve 调试器
- Wire 依赖注入
- gomock 官方文档
- Task 任务运行器
项目源码: https://github.com/PFinal-tool/pf_tools
希望这些工具能帮助你成为更高效的 Go 开发者!如果你有其他好用的工具推荐,欢迎留言分享。